Showing posts with label Widgets. Show all posts

March 20, 2015

Why & How To Add Sticky Ad in WordPress SideBar

Sidebar is one crucial aspect for lead generation and to get more conversion. I have seen many times bloggers don’t take advantage of sidebar. If you also don`t take full advantage of your sidebar, then it`s time for you to start taking optimum care of sidebar. In sidebar place those things which help you increase page-views and get more subscribers and add ads to make more money. But don`t add useless sidebar widgets.
Why & How To Add Sticky Ad in WordPress SideBar : eAskme
Other people are reading : 10 Evergreen Movies That Will Inspire You to Make More Money

Today, I am sharing how you can can double your conversion or earning by optimizing your sidebar. Sticky sidebar is not a new concept. You might have noticed sticky widget on many sites.

When you scroll down, sidebar widget also floats with scrolling of the page. This helps you to get more attention to your sidebar widget.

Reasons to use sidebar widget:

  • To get more clicks on one of ads.
  • To get more subscribers.
  • To get more Facebook likes or social followers.
There are many other ways to take benefit from sidebar.

Today I will share how you can add sticky sidebar widget in WordPress using plugin. This hardly take 4 or 5 minutes.

Also See : Best Solution For Blog Posts Interlinking in WordPress

WordPress Sidebar Sticky plugin To Make your Widget Sticky:

I am talking about two WordPress plugins here which help you to add sticky widget to your blog sidebar.

Q2W3 Fixed Widget plugin (Sticky widget)

Q2W3 Fixed Widget plugin is a free plugin.  This offers a sticky widget. This is one of the simplest plugin.

Twitter Now Has An Official WordPress Plugin, Lets See What It Does

How to Install Q2W3 Fixed Widget plugin?

Click here to download Q2W3 Fixed Widget plugin
  • Go to Apperance 
  • Go to Widgets 
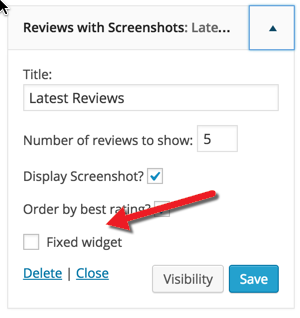
  • Now you can make any sidebar widget sticky.

Q2W3 Fixed Widget plugin
  • Click on the checkbox to select which sidebar you want to make sticky.
  • Add a checkbox in front of Fixed-widget
  • Sticky Widget WordPress plugin
  • Click on save selected sidebar widget gets sticky.
I recommend you to use it on the last sidebar widget to avoid overlapping.

Q2W3 Fixed Widget plugin

Fixed Widget WordPress plugin

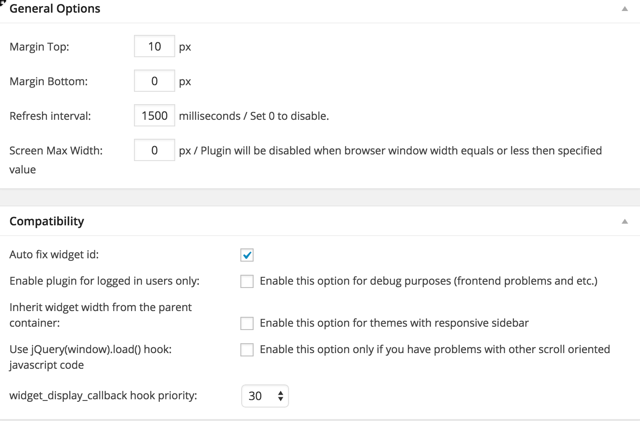
How to make changes in plugin settings of Q2W3 Fixed Widget plugin
  • Go to Appearance
  • Click on fixed widget options
  • Make changes.

 Standard Widgets section:

Standard Widgets section allows you to add Sticky Widget effect with Accordion effect in sidebar widget. Click here to download this plugin.

Fixed Widget WordPress plugin

Only use this plugin if you want accordion effect.

Note: Never make your AdSense ad widget sticky.

Also See : WordPress Plugins You Should Install on Your Blog

What widgets should you make sticky?

  • Promote any of your top content.
  • Email subscription widget.
  • CPC ads
  • Affiliate ad
I recommend you to use it on your blog subscription widget, it will help you increase readership.

Do share how you are using this fixed widget? Which elements you are promoting?
>

February 26, 2015

Twitter Official WordPress Plugin, Not Updated in 5 years

Twitter Official WordPress Plugin, Not Updated in 5 years. This official WordPress Plugin combines various features which were available through third party apps till now such as ability to embed videos and ability to embed tweets directly to Twitter.

Twitter Now Has An Official WordPress Plugin, Lets See What It Does : eAskme
Other people are reading : SEOprofiler Review : The Best SEO Software Solution

Don`t think at any time that Wordpress didn`t had embed tweets feature till now. WordPress already had this feature but that was not from twitter.This new official twitter plugin for Wordpress allows you to embed and customize twitter videos and tweets to blend in with the your site design, Which is actually a very good news.

Benefits of Official WordPress Plugin:

Till now the embed tweets features of WordPress make you stuck when it come to change color. New Official WordPress Plugin allows you to customize font colors and backgrounds as you want. Now embedded Twitter cards also include link previews.

Official WordPress Plugin embed tweets faster than any other tool available online. Such as this tool already have the ability to embed tweets with video.
But currently if you want to use this new feature on WordPress, you probably have to wait for the next major update to WordPress CMS. Currently you can use it in theory, but soon it be live on WordPress.

Here are more features of Official WordPress Plugin:

Tweet Button: A sharing button include the URL of the post, share text, hashtags, site and author Twitter accounts.
Twitter Analytics: You can easily track the popularity of your content.
Follow Button: This help you to convert visitors into followers.
Twitter Advertising: Track actions Twitter ad effect on your site.

Click here to download official Twitter plugin for Wordpress.

I really impressed with this new launch and I believe it work better than other third party embed tools.

Do share what you think about this new official twitter plugin? If you find this article useful, do share on your social networks.

>

February 23, 2015

Most Amazing Pre Loading Spinners for Blogger Blogs

Every blogger want to make his blog attractive for visitors with design, plugins, images and videos. But today I am going to share with you something different.

Today I will show you how to add pre loading spinners to a blog. This is a visual efect which shows before loading your blog or website. When your site get load, this effect fades away. I recommend everyone to try this to make your blog more attractive and see which work best for you.

Today I am sharing 5 pre loading spinners for your blogger blogs.

Amazing Pre Loading Spinners for Blogger Blogs : eAskme
Other people are reading : 50 DoFollow CommentLuv Enabled Blogs

To make these spinners work for you all you need to do is add spinner code to.

How to Add Most Amazing Pre Loading Spinners Code to blog:

  • Go to Blogger.com
  • Login.
  • Go to your blog dashboard.
  • Go to "Template". 
  • Click on "Edit Template".
  • Copy any code from below give codes.

Most Amazing Pre Loading Spinners

Code 1

Most Amazing Pre Loading Spinners for Blogger Blogs

Code 2

Most Amazing Pre Loading Spinners for Blogger Blogs

Code 3

Most Amazing Pre Loading Spinners for Blogger Blogs

Code 4

Most Amazing Pre Loading Spinners for Blogger Blogs

Code 5

Most Amazing Pre Loading Spinners for Blogger Blogs

  • Paste the code below <body> tag.
  • Now you have this Pre Loading Spinner active on your blog.
Do try any one of these Amazing Pre Loading Spinners for Blogger Blogs and make your blog more attractive. If you have any question, feel free to ask me via comments.

Don`t forget to like us on facebook and subscribe our newsletter to get free updates.
>

February 22, 2015

Thesis like Social Media Subscription Widget For Blogger

Social media is the biggest blessing of Internet. Every blogger need to have a strong social media presence to get huge traffic, gain more followers and make blog a brand. I have already shared about Email subscription widgets for blogger.

Today I am going to share about Thesis like Social Media Subscription Widget For Blogger. This widget is in CSS3. Do check this and see the difference.

Thesis like Social Media Subscription Widget For Blogger : eAskme
Other people are reading : Best Sites Where You Can Buy and Sell Articles

How to Add Social Media Subscription Widget

  1.     Go to Layout
  2.     Click on Add A Gadget
  3.     Click on HTML/JavaScript
  4.     Click here to copy the code.
  5.     Paste code in  HTML/JavaScript box.
  6.     Replace highlighted codes with URL`s of your profiles.
  7.     Click on "Save"
So you see this is really easy to Add Thesis like Social Media Subscription Widget For Blogger. If you find this article helpful, do share on twitter and Google Plus.

Don`t forget to like us on facebook and subscribe our newsletter to get free updates.
>

January 28, 2015

Best Email Subscription Box

Subscribers and followers are the life of a site. Users who subscribe to a site or blog are real loyal followers. Those who subscribe to your site usually come regularly on your site. So it is very important to have email subscription box on your site or blog. It also help you to send updates to your subscribers in their inbox without doing any effort and they always stay updated. This will increase traffic and also increase loyal followers. So today we are going to talk about a very important topic that is Email Subscription Box.

Email Subscription Box : eAskme

Email Subscription Box for Blogger:

Simple and Stylish Email Subscription Box for Blogger

Simple and Stylish Email Subscription Box for Blogger : eAskme

To add this simple and stylish email subscription box to blogger you just need to follow below steps:

Login to Blogger.com
Go to "Layout"
Click on "Add a Gadget"
A popup window will open. Now click on "HTML/JavaScript".
Get Code from here and enter in the "HTML/JavaScript" Box.
Click on "Save".

3D Email Subscription Box Widget For Blogger :

3D Email Subscription Box Widget For Blogger : eAskme
To add this simple and stylish email subscription box to blogger you just need to follow below steps:
Login to Blogger.com
Go to "Layout"
Click on "Add a Gadget"
A popup window will open. Now click on "HTML/JavaScript".
Get Code from here and enter in the "HTML/JavaScript" Box.
Click on "Save".

A CSS Email Subscription Box For Blogger :

A CSS Email Subscription Box For Blogger : eAskme
Login to Blogger.com
Go to "Template"
Click on "Edit HTML"
Now search for "]]></b:skin>"
Copy this CSS code  and paste above "]]></b:skin>".
Now search "<data:post.body/>" and paste this CODE after it.
Click on "Save Template".

Elegant Email Subscription Box For Blogger:

Elegant Email Subscription Box For Blogger : eAskme
This is an email widgest for blogger.

Login to Blogger.com
Go to "Template"
Click on "Edit HTML"
Now search for "]]></b:skin>"
Copy This CSS code from here and paste above "]]></b:skin>".
Click on "Save template".
Now go to "Layout"
Click on "Add a gadget".
Click on "HTML/JavaScript".
Copy Code from Here  and paste in "HTML/Javascript" Box.
Click on "Save".

Subscribe Today Email Subscription for Blogger:

Subscribe Today Email Subscription for Blogger : eAskme
Login to Blogger.com
Go to "Layout"
Click on "Add a Gadget"
A popup window will open. Now click on "HTML/JavaScript".
Get Code from here and enter in the "HTML/JavaScript" Box.
Click on "Save".

Hover Style Email Subscribe Box:

Hover Style Email Subscribe Box : eAskme
Login to Blogger.com
Go to "Layout"
Click on "Add a Gadget"
A popup window will open. Now click on "HTML/JavaScript".
Get Code from here and enter in the "HTML/JavaScript" Box.
Click on "Save".

Email Subscription Box Below Every Post In Blogger:

Email Subscription Box Below Every Post In Blogger : eAskme
Login to Blogger.com
Go to "Template"
Click on "Edit HTML"
Search for "<div class='post-footer'>"
Copy code from HERE and paste above "<div class='post-footer'>"
Now search for "]]></b:skin>"
Copy This CSS code from HERE and paste above "]]></b:skin>".
Click on "Save template".

Google+ Style Subscription Box Widget For Blogger:

Google+ Style Subscription Box Widget For Blogger : eAskme
Login to Blogger.com
Go to "Layout"
Click on "Add a Gadget"
A popup window will open. Now click on "HTML/JavaScript".
Get Code from here and enter in the "HTML/JavaScript" Box.
Click on "Save".

Stylish Subscription Box For Your Blog:

Stylish Subscription Box For Your Blog : eAskme
Login to Blogger.com
Go to "Template"
Click on "Edit HTML"
Search for "<data:post.body/>"
Copy code from HERE  and paste below "<data:post.body/>"
Click on "Save template".

Best Email Subscription Box:

Best Email Subscription Box : eAskme
Login to Blogger.com
Go to "Layout"
Click on "Add a Gadget"
A popup will open. Now click on "HTML/JavaScript".
Get Code from here  and enter in the "HTML/JavaScript" Box.
Click on "Save".

Add Stylish Social Subscribe Box for Blogger 

Add Stylish Social Subscribe Box for Blogger : eAskme
Login to Blogger.com
Go to "Layout"
Click on "Add a Gadget"
A popup will open. Now click on "HTML/JavaScript".
Get Code from here  and enter in the "HTML/JavaScript" Box.
Click on "Save".

New Stay Connected subscription box for blogger blog :

New Stay Connected subscription box for blogger blog : eAskme
Login to Blogger.com
Go to "Layout"
Click on "Add a Gadget"
A popup will open. Now click on "HTML/JavaScript".
Get Code from here  and enter in the "HTML/JavaScript" Box.
Click on "Save"

How To Add Subscribe Box to Blogger/Website:

How To Add Subscribe Box to Blogger/Website : eAskme
Login to Blogger.com
Go to "Layout"
Click on "Add a Gadget"
A popup will open. Now click on "HTML/JavaScript".
Get Code from here  and enter in the "HTML/JavaScript" Box.
Click on "Save"

Add A Cool Subscription Box For Blogger In Sidebar:

Add A Cool Subscription Box For Blogger In Sidebar : eAskme
Login to Blogger.com
Go to "Layout"
Click on "Add a Gadget"
A popup will open. Now click on "HTML/JavaScript".
Get Code from here  and enter in the "HTML/JavaScript" Box.
Click on "Save"

Scrolling Slide-Hover Pop up Subscription Box for Blogger:

Scrolling Slide-Hover Pop up Subscription Box for Blogger : eAskme
Login to Blogger.com
Go to "Layout"
Click on "Add a Gadget"
A popup will open. Now click on "HTML/JavaScript".
Get Code from here  and enter in the "HTML/JavaScript" Box.
Click on "Save"

One Time Popup Email Subscription Box for Blogger:


Visit here

So these are few of the best email subscription boxes. In coming days I will keep updating this list, so to get updates right on time in your inbox, subscribe our feed. We have already talked about How to Set Up an Email Subscription for Blogger.

If you do have any question and suggestion feel free to say in comments.
 
Don't forget to like us FB and join the eAskme newsletter to stay tuned with us. 
>

November 29, 2014

Professional Social Sidebar Widget for Blogger and Widget 2018

People usually start blogging on Blogger platform and after some time move to WordPress. Blogger is awesome platform to start Blogging career, and learn everything that you need to be a blogger. Blogger also allow you to customize it easily with template, widgets and plugins. Many people have misconception that blogger is not customizable like WordPress, but actually you can easily customize your blogger blog with widgets.

Professional Social Sidebar Widget for Blogger : eAskme
Other people are reading : How to Create Sitemap Page in Blogger

We all want to get traffic from social networks and best way to do it is by sharing your posts on social networks. Social sharing widget help your readers to share the posts they like on their social profiles, and it increase traffic to your site. Today we are talking about most Professional Social Sidebar Widget for Blogger. Social Sidebar Widget for Blogger is a very beautiful and attractive social widget.

How to add Professional Social Sidebar Widget on Blogger

  • Go to Blogger Homepage
  • Login with your account details.
  • Go to your blog dashboard.
  • Go to "Layout"
  • Click on "Add a gadget".
  • Find "HTML/Javascript" and click on "+" sign to add it.
  • Now Copy Professional Social Sidebar Widget Code from HERE and paste it in "HTML/JavaScript" box.
  • Click on "Save".
  • Click on "Save Arrangements".

Also get : free Responsive Blogger Template 

Now open your blog and you will see this professional social sharing widget on your blog side. Now you and your readers can easily share your posts from there. If you do have any question installing social widget on blogger, feel free to ask me in comments. If you like this article do share on Twitter and Google Plus.
>

Add Email Subscription Box In Header With Social Icons

We have already talked a list of email subscription widgets and How To Make Money With Email Subscribers List . So now today we are increasing this list forward and talk about email subscription widget with social icons in header. This is one of the best email subscription widget to increase the email subscribers instantly. It shows in header, that means it is visible to everyone and chances are that more people can subscribe. I have also tested this widget in some of my sites. Installing this widget in your blog is not so difficult but before the tutorial let me tell you something about that widget.

Add Email Subscription Box In Header With Social Icons : eAskme
Other people are reading : Boost Up Email Subscribers Of Your Blog

Header Email Subscription Widget With Social Buttons

This is clean and stylish header email subscription widget. It also includes social buttons for increasing social followers. There is  a subscription form with Name and Email with the subscribe button in left portion. In right portion it has social buttons such as Facebook, Pinterest, Twitter, Google+ and Feed burner. Header is a great place for any widget and when you place this widget it surely increase your subscribers.

How to Add Email Subscription Box In Header With Social Icons


  •     Go To Blogger 
  •     Go To Layout 
  •     Click on "Add a Gadget".
  •     Select "HTML/JavaScript"
  •     Copy code from HERE and Paste in "HTML/JavaScript" box.
  •     Replace The URLs
  •     Click on "Save"

Final Words

So friends, fans and followers this is a stylish subscription widget for header. I hope you have liked this widget. try this on your blog and do share your experience with us.Any problem, do let me know in comments. Happy Blogging!
>

How to Create Sitemap Page in Blogger

This is a common question asked by every newbie blogger who do blogging on BlogSpot or Blogger Platform. Sitemap page is where you can see all links of your site together without adding them manually.

I believe you have already seen Sitemap on eAskme. If you haven`t seen then check it here. It is not necessary to have a Sitemap page but still it is good to have a sitemap page. Sitemap page helps for easy navigation and also help to improve pagerank of your blog as it work as iternal linking. In this page you will see all published posts. Siemap also helps search engines  to crawl and index your blog easily. Today we will talk about sitemap page for blogger.
How to Create Sitemap in Blogger : eAskme
Other people are reading : Blog Niche and Topic Ideas for Creating a Blog

Before you start using this sitemap page for blogger, I would like to describe its features to you. This is a clean sitemap page which is only for blogger blogs. It ha blue color theme. This sitemap automatically adds every new page updated on your site in sitemap, you need not to do anything to add pages to sitemap again. Sitmap pages is developed with JavaScript and CSS.

How to Create Sitemap Page in Blogger

So let`s see how  to add this sitemap page in Blogger blogs. Just follow the simple steps given below.
  •     Go To Blogger
  •     Go to Dashboard
  •     Go to "Pages" 
  •     Click on "Create New Page"
  •     Click inside Blank Page.
  •     Insert Page Title "SiteMap".
  •     Go To HTML Tab
  •     Copy Sitemap Code from HERE and Paste in HTML Tab.
  •     Replace eAskme With Your Own Blog Domain.
  •     Click on "Publish" and it`s done.

Final Words

This Sitemap Page to create sitemap for blogger. I believe this help to those who need sitemap page for their blog. If you have any problem creating sitemap for blogger in your blog then feel free to ask me in comments. If you like this post then don`t forget to share with your friends on Twitter and Google Plus. Try this and we will soon be back with more widgets.
>

Simple Flat UI Email Subscription Box For Blogger

If you are a professional blogger than you already know the importance of email subscription box. It is important to build email list. We have already shared a list of Email Subscription Box. Email list also help you to make money with email. You can easily increase number of email subscribers by adding attractive subscription box and get more email subscribers. I believe that all bloggers are using sidebar subscribe box. Today we will talk about a simple Flat UI email subscription box for blogger. So let`s see features of Flat UI email subscription box.

 Simple Flat UI Email Subscription Box For Blogger : eAskme
 Simple Flat UI Email Subscription Box For Blogger : eAskme
Other People are reading : Create Sitemap Page in Blogger

Simple Flat UI Email Subscribe Box

This is just simple  and clean Flat UI email subscription widget which will help you to gain more subscribers. It has simple Flat UI style design which attracts more people to be subscribers. It show a unique message.It also contains two input fields for name and email.When you enter name and email, it shows a beautiful shadow effect on subscriber name and email. It has a big sign up button with Flat effect. The best thing is that it is written in CSS3 and thats why it do not affect your blog speed.

How To Add This in Your Blog?


  •     Go To Blogger 
  •     Go To Layout 
  •     Click on  "Add a Gadget".
  •     Choose "HTML/JavaScript"
  •     Copy Code from HERE and Paste "HTML/Javascript" box.
  •     Replace eAskme with your feedburner feed name.
  •     Click on "Save"
  •     Click on "Save Arrangements".

So try this and do share if you like Flat UI email subscription box. Share this widget with your friends on twitter, Google plus and other social networks. If you do have any question, feel free to ask me in comments.
>

November 27, 2014

Popular Most Commented Posts Widget for Blogger with Comment bubbles!

Most of our reader retested us to tell how we have created the Most commented widget. You can see this widget on our sidebar. This is a simple copy paste tools. It is an already existing script from Yahoo! Pipes. You can install this toll very easily. So lets see how to add dynamic and fast loading Most Commented Posts Widget to your blogger blogs!

Popular Most Commented Posts Widget for Blogger with Comment bubbles : eAskme

Other people are reading : Fancy Ribbon Backgrounds For Blogger Sidebars!

How to Create Most Commented Posts Widget for Blogger with Comment bubbles! 

How to Add Most Commented Widget to Blogger


  •     Go to Blogger 
  •     Go to Layout
  •     Click "Add a Gadget"
  •     Click on "HTML/JavaScript".
  •     Copy Code from HERE and Paste in "HTML/JavaScript" box.

    Make these small changes:


  •     Replace http://www.easkme.com with your Blog URL
  •     Replace this 10 with how many post you want to display.
  •     To change the background color of the comment bubbles, by changing hexadecimal color codes ( #292D30 ).
  •     Replace #FFF to change count color
  •     Replace #dedede to change border color. 
  •     Click on "Save"
  •     Click on "Save Arrangements".

Now check you blog and you will see the fancy most commented bubbles

Final Words:

So readers, fans and followers this is the best and stylish most commented widget for blogger. We hope you will find it useful. If you need any help, do let me know in comments. We will be updating more widgets and tips. Subscribe eAskme to get updates always.
>

Fancy Ribbon Backgrounds For Blogger Sidebars!

Lets make sidebar deadlines look awesome by adding cool Design.Today we will talk about customizing sidebar Headline Backgrounds in Blogger templates. If you use photoshop designs, then it can slow your site. So we will talk about a CSS3 solution to use Ribbon style backgrounds without using a any image! This allow you to create ribbon backgrounds in any platform either wordpress or Blogger. You just need to add up CSS styles. So let`s start with it.

Fancy Ribbon Backgrounds For Blogger Sidebars : eAskme

Other people are reading : How To Add Google Custom Search Engine in Blogger

How to Create Ribbon backgrounds in Blogger

First of all you need to get ID of the widget:

How to find the Widget ID:

  •     Go To Blogger
  •     Go To Layout
  •     Click on edit to open any widget
  •     In URL of widget you will find widgetID like HTML13 in our case. 
  •    Copy this widget value.
widgetID

Now let`s do second step.

Also See : BluePrint Subscription Widget In Blogger

How to Design the ribbon Background with CSS3

  •     Go To Blogger
  •     Go To Template
  •     Click on "Edit HTML" 
  •     Search for ]]></b:skin>
  •     Copy Code from here and Paste it above ]]></b:skin>
Now follow below mentioned customization tips to change color of the ribbon:
  •     Change background color of ribbon by editing hexadecimal color codes highlighted as yellow i.e: #282C2F
  •     Change background color of the ribbon tails by editing #353A3D 
  •     Change the text color by edititing #ffffff
  •     Change the top border color by editing #000000; You can also delete border by deleting border-top: 3px solid #000000; 
  •     Change the width of ribbon background by editing 338px

  •     Click on "Jump to widget" and select the widget value like HTML13:
  •     Expand the code.
  •     Search for <h2 class='title'><data:title/></h2>
  •     Replace above code with this code <h2 class='title'><span><data:title/></span></h2>
  •     Click on "Save template".

Now you will see this awesome Fancy Ribbon Backgrounds For Blogger Sidebar showing on your blog.

Final Words:

So fans, friends and followers, Try this beautiful widget and see how it work for you. If yu face any issue do ask us in comments. We will be updating more widgets everyday. Subscribe us to stay updated with eAskme. Happy Blogging!
>

November 26, 2014

How To Add BluePrint Subscription Widget In Blogger

Email Subscription widgets are very important for every blog to increase fans and subscribers. There are so mane email subscription widgets available online. But what we show here are most professional email subscription widgets. In this email subscription widget you see the title at the top and impressive social icons to increase social followers. There is also a message for subscription. It is a responsive subscription form. It is a simple and stylish widget.

How To Add BluePrint Subscription Widget In Blogger : eAskme
Other people are reading: The Ultimate List of Blog Niche and Topic Ideas

Why To Use BluePrint Subscription Widget In Blogger ?

BluePrint Subscription Widget In Blogger help you to make your blog more stylish and impressive and also help you to increase your followers quickly. This widget is created with HTML and CSS3.

This widget is designed by eAskme. if you are sharing this widget on your site than you should link back to us. Respect our efforts. Thanks.

  •     Go To Blogger 
  •     Go To Layout 
  •     Click on "Add a Gadget".
  •     Select "HTML/JavaScript".
  •     Copy code from HERE and paste in "HTML/JavaScript".
  •     Replace links with your own links
  •     Replace Sign Up message
  •     Replace eAskme With Your Feedburner Name.
  •     Click on "Save" Button. 

Final Words:

So fans, friends and followers, tell me how you like this widget. I am sure this will help you. If you face any issue, feel free to ask in comments. Also share your suggestions in the comment. Also subscribe us. Happy Blogging!
>

How To Add Beautiful Flat UI Buttons in Blogger

Bloggers are professionals and it is important for a professional blogger to have a professional design. Professional designs have its own benefits. Bloggers and webmasters always keep experimenting with new themes and widgets to make their blog attractive and user friendly. The deisgn of blog always need to be user friendly and SEO friendly. We have already talked about colorful Flat UI label cloud widget for blogger and we have recieved lot of appreciation for that article, so today we are going to discuss about Flat UI element for blogs that is Flat UI buttons for blogger.

Beautiful Flat UI Buttons - Review

These Flat UI design buttons are actually beautiful which help us to bring awesomeness to design. You can customize these buttons in different colors and sizes. There are three sizes big, medium and small. You can choose Flat UI color for buttons according to your own choice. The best thing is that these buttons are coded in CSS3 and that`s why they don`t affect the speed of blog. These UI buttons work perfectly on all browsers.

How To Add Beautiful Flat UI Buttons in Blogger : eAskme
Other People are reading : Free Responsive Blogger template

How To Add Beautiful Flat UI Buttons in Blogger?

It is really easy to add beautiful flat UI buttons in Blogger by following steps.

Installation

  •     Go To Blogger
  •     Go To Template
  •     Click on "Edit HTML" 
  •     Search For </head>
  •     Copy the Code from HERE and paste Above </head>
  •     Click on "Save template"

Adding Flat UI Buttons in Blogger 

You can easily use flat UI buttons anywhere in your blog post or blog design.

Here are the designs of Flat UI Buttons

Big Size Buttons

<a class="button blue big" href="http://www.easkme.com/">Blue Button</a>
<a class="button green big" href="http://www.easkme.com/">Green Button</a>
<a class="button red big" href="http://www.easkme.com/">Red Button</a>
<a class="button purple big" href="http://www.easkme.com/">Purple Button</a>
<a class="button seagreen big" href="http://www.easkme.com/">SeaGreen </a>

Medium Size Buttons

<a class="button blue medium" href="http://www.easkme.com/">Blue Button</a>
<a class="button green medium" href="http://www.easkme.com/">Green Button</a>
<a class="button red medium" href="http://www.easkme.com/">Red Button</a>
<a class="button purple medium" href="http://www.easkme.com/">Purple Button</a>
<a class="button seagreen medium" href="http://www.easkme.com/">SeaGreen</a>

Small Size Buttons

<a class="button blue small" href="http://www.easkme.com/">Blue Button</a>
<a class="button green small" href="http://www.easkme.com/">Green Button</a>
<a class="button red small" href="http://www.easkme.com/">Red Button</a>
<a class="button purple small" href="http://www.easkme.com/">Purple Button</a>
<a class="button seagreen small" href="http://www.easkme.com/">SeaGreen </a>

Replace site name "eAskme" with your blog URL and text and it`s done.

Final Words

These are Flat UI Buttons for Blogger. If you face any issue adding these buttons, feel free to ask in comments. If you like this article do share on twitter and Google Plus. Keep coming on eAskme for the upcoming hot dishes.
Big Size Buttons   
Blue Button
Green Button
Red Button
Purple Button
SeaGreen 
Medium Size Buttons
Blue Button
Green Button
Red Button
Purple Button
SeaGreen
Small Size Buttons 
Blue Button
Green Button
Red Button
Purple Button
SeaGreen
>

Customized Colorful Flat UI Labels Cloud Widget For Blogger

It is always the best to improve the appearance of your blog like bringing professionalism and awesomeness to templates and themes. There are so many reasons for this like getting approval for ads. There are a lot more professional templates available on the Internet that you can use. The next thing after template is to have professional widgets like Social Sharing, Popular Posts widget, Related Posts, Labels or Tags widget etc. Even if you dont have any programming skills still you can use awesome widgets that are available online. Today we will discuss about a beautiful widget that will hel you make Labels attractive. This is a label cloud widget for blogger.

Customized Colorful Flat UI Labels Cloud Widget For Blogger : eAskme
Other people are reading : How to Install Disqus Comment System Manually on Blogger

Colorful Flat UI Labels Cloud Widget

Metro and Flat UI designs are trending these days. Today, when I was thinking about this topic to update on eAskme. So I share this widget here. So make your labels colorful with colorful Flat UI label cloud widget.

In colorful Flat UI label cloud widget labels and tags have multiple colors. That`s why we call it colorful and It become flat UI. The colors are also Flat UI colors. There is also beautiful mouse hover effect on it.This widgets is in CSS3. We have also checked it on few of our blogs. Now Let`s see how to add colorful Flat UI label cloud widget for Blogger.

Also Get : Free Responsive Blogger Template

Adding Labels Cloud Widget

  •     Go To Blogger 
  •     Go to Layout
  •     Click on Add a Gadget
  •     Select "Labels" Widget.
  •     Make Settings Like The Below Image & "Save" It.
Adding Labels Cloud Widget : eAskme

Customizing Labels Cloud Widget

  •     Go To Blogger 
  •     Go to Template
  •     Click on "Edit HTML" 
  •     Search For ]]></b:skin>
  •     Copy the Code from HERE and Paste it Above ]]></b:skin>
  •     Click on "Save Template"
  •    "Congratulation!" You have successfully installed Colorful Flat UI Labels Cloud Widget.

Final Words

So you see this is the colorful Flat UI label cloud widget. This will help bloggers to improve the design and navigation of your blog. If you have any problem in adding Flat UI label cloud widget, then feel free to ask in the comments. We will be updating more widgets soon. If you like this article, don't forget to share with your friends. Take care!

>

How to Install Disqus Comment System Manually on Blogger

Disqus comment system is one of the most popular system of commenting in blogs. It is very easy to install Disqus comment system in your blog. It add many features to commenting system of your blog. Before we talk about how to add Disqus comment system, let`s first look for features of Disqus Comment system.

How to Install Disqus comment System Manually on Blogger  : eAskme
How to Install Disqus comment System Manually on Blogger  : eAskme
Other people are reading : Professional Social Sidebar Widget for Blogger and Widget

Features of Disqus Comment System and Why We Use It?

Realtime comments

Disqus make comments like live discussions with realtime commenting and updating. If you want a faster way for commenting then Disqus is a good choice.

Reply and Notification System

The notification system of Disqus help people to know when they receiv a response on their comments or posts. Also they can continue conversation even from their emails.

Inline media embedding

Disqus is fully integrated with media services like Flickr, Youtube and more.

See this : How to Create Sitemap Page in Blogger

Mobile commenting

Disqus comment system if fully compatible with mobile websites.

Social integration

Disqus is fully integrated with popular social networks like Facebook, Twitter, Google Plus and more.

The Community Box

You can also participate in community and grow your audience.

Also See : How To Add Floating Social Share Buttons To WordPress

Liking and sharing

Disqus allow users to rate and share on social networks.

Moderation tools

Disqus provide you a moderation panel to handle your comments

Spam-Be-Gone

Disqus anti-spam technology keeps spam away from your site.

Mobile apps

Disqus also provide apps that are available for the iPhone, Android, and webOS phones.

Also See : Best Email Subscription Box

Blacklists and whitelists

You can also make comments blacklist and whitelist to set the priority and spam.

Import and export

Disqus also allow you to import and export comments to your existing comment system.

International languages

Disqus comment system supports dozens of languages.

SEO-friendly and local sync

Disqus also offerr plugins and integration methods.

Theme customization

Disqus theme editor allow you to craft your own custom theme.

Tweets and reactions

Disqus also bring conversation back to site by collecting Tweets.

Also See : Top 3 Scrolling, Floating Social Media Buttons for blogger blog

Profile management

Disqus makes it easy to track and keep conversations together.

Activity streams

Integrated activity streams allow people see where else the smart people are talking.

Connected communities

Disqus reaches 200 million people every month across half a million websites and communities on the web.

Also See : Tips and Tricks for New Bloggers

How To Install Disqus Comment System In Blogger?

Now Follow the steps given below. You can add Disqus comment system to your blog easily.

  •     Go to Disqus.com. 
  •     Click on signup.
  •     Login.
  •     Click on "Setting".
  •     Click on "Install".
  •     Select blogging platform.
  •     Installing disqus comment 
  •     Select blogger as my platform.
  •     Select your blog.
  •     Click on Add Widget.
  •     Save blog setting. 
  •     Now you will see Disqus comment box.

How to Import Old Comments Of Blogger?

  • Sign in To Disqus.com
  • Click on Dashboard.
  • Click on "Your Sites", select name of your blog.
  • Click on Tools.
  • Click on "Blogger".
  • Click on "Import comments from Blogger."
  • Grant Access.
  • Select your blog.
  • Click on Import.
Now you have successfully imported old comments on Disqus. If you have any issue to install Disqus comment system on Blogger, then feel free to ask me in comments. If you like this article, do share it on Twiter and Google Plus.

>

November 23, 2014

How To Add Floating Social Share Buttons To WordPress

Social networks are the best and easy to way to get traffic to your website or blog. There are many widgets and plugins available online for adding social share buttons on your site. Today we are going to talk about floating social sharing buttons and the best plugin is Digg-Digg for WordPress. So today we are giving you official WordPress plugin.

Floating social share Wordpress plugin is very easy to install and configure for showing social sharing buttons. This plugin support all main social networks like FB, Twitter, Google Plus, Buffer, Pocket and LinkedIn. This social sharing widgets scroll with the body of your blog and this is always visible to the readers.

How To Add Floating Social Share Buttons To WordPress : eAskme
Other people are reading : Email Subscription Box

How to Configure Floating Social Share WordPress Plugin?

This is an easy to configure and install plugin. Download it from here install and configure. To configure this plugin go to "Settings" then "Floating Share" then choose icons to display.  You cna also change position of this plugin.

This widget do not show when you use in mobile, as floating can block view of text to readers on mobile. If you have any question or suggestion feel free to ask me. If you like this article don`t forget to share on Google Plus and Twitter.
>

November 12, 2014

Top 3 Scrolling, Floating Social Media Buttons for blogger blog

Why need Social Sharing buttons widget :

Everyone know what is Facebook. And we know millions of people and most of our friends use one or other social networking site like Facebook, Twitter, Pinterest. Social Media is a big place to share your Blog posts and get a lot of traffic.

I get most of my traffic from Social Networks and Google search. Juts all we need to do is install a Social sharing widget in Blog. and Start sharing posts and give others chance to share what they like.

Top 3 Scrolling, Floating Social Media Buttons for blogger blog : eAskme
Other people are reading : How to Add Popup Email Subscription Box

How to add Social Media Buttons :

We know that social points to any of the blog is much importance and good for search engine and counted as a positive vote. Search engine give more visibility of the page URL which has more social sharing votes. So now i am telling you this nice gadget and how to add it to blogger.

How to Install Social Sharing Widget :

Go to blogger dashboard
Open your blogger blog
Click on Layout (as shown in picture)
A new Window will appear
Click on Add gadget
Select HTML/JavaScript
Box of HTML/JavaScript will appear ( as shown in picture)
Click on HTML/JavaScript.
Now paste the following code to install the gadget to your blog.
To add just copy the code and paste it in the box like shown above.

See also : How to Add Twitter Widget to Blogger Blog

Style 1 

<!-- AddThis Button BEGIN -->
<div class="addthis_toolbox addthis_floating_style addthis_counter_style" style="left:50px;top:50px;">
<a class="addthis_button_facebook_like" fb:like:layout="box_count"></a>
<a class="addthis_button_tweet" tw:count="vertical"></a>
<a class="addthis_button_google_plusone" g:plusone:size="tall"></a>
<a class="addthis_counter"></a>
</div>
<script type="text/javascript" src="//s7.addthis.com/js/300/addthis_widget.js#pubid=xa-535b72b51ce3bdc1"></script>
<!-- AddThis Button END -->

See this also : How to Add a Blogroll to Blogger Blog

Style 2

<!-- Scrolling social Button BEGIN --> <div class="addthis_toolbox addthis_floating_style addthis_32x32_style" style="left:50px;top:50px;">
<a class="addthis_button_facebook"></a><a class="addthis_button_twitter"></a><a class="addthis_button_delicious"></a><a class="addthis_button_pinterest_share"></a><a class="addthis_button_digg"></a><a class="addthis_button_orkut"></a><a class="addthis_button_google_plusone_share"></a><a class="addthis_button_myspace"></a><a class="addthis_button_compact"></a><h6>
<a href="http://www.mbgadget.com/2013/06/blogger-scrolling-social-buttons.html">Widget</a></h6>
</div>
<script type="text/javascript" src="//s7.addthis.com/js/300/addthis_widget.js#pubid=ra-508240f16db23831"></script><!-- Scrolling social Button END -->

Style 3

<!-- Scrolling social Button BEGIN --> <div class="addthis_toolbox addthis_floating_style addthis_16x16_style" style="left:50px;top:50px;">
<a class="addthis_button_facebook"></a><a class="addthis_button_twitter"></a><a class="addthis_button_delicious"></a><a class="addthis_button_pinterest_share"></a><a class="addthis_button_digg"></a><a class="addthis_button_orkut"></a><a class="addthis_button_google_plusone_share"></a><a class="addthis_button_myspace"></a><a class="addthis_button_compact"></a><h6>
<a href="http://www.mbgadget.com/2013/06/blogger-scrolling-social-buttons.html">Widget</a></h6>
</div>
<script type="text/javascript" src="//s7.addthis.com/js/300/addthis_widget.js#pubid=ra-508240f16db23831"></script><!-- Scrolling social Button END -->


Use any one of these social widget on blog and your traffic will surely increase. Do share which type of social widgets you like to use.
>

Man Behind eAskme

bio

Gaurav Kumar

Gaurav Kumar is the founder of eAskme.com. He is the professional blogger, writer, motivational speaker and online. He the man behind "Blogging for money guide" and "complete domain name guide". eAskme will help you to become an online entrepreneur. You can learn SEO, Money MAKING, SEO, blogging and more.

More About Me